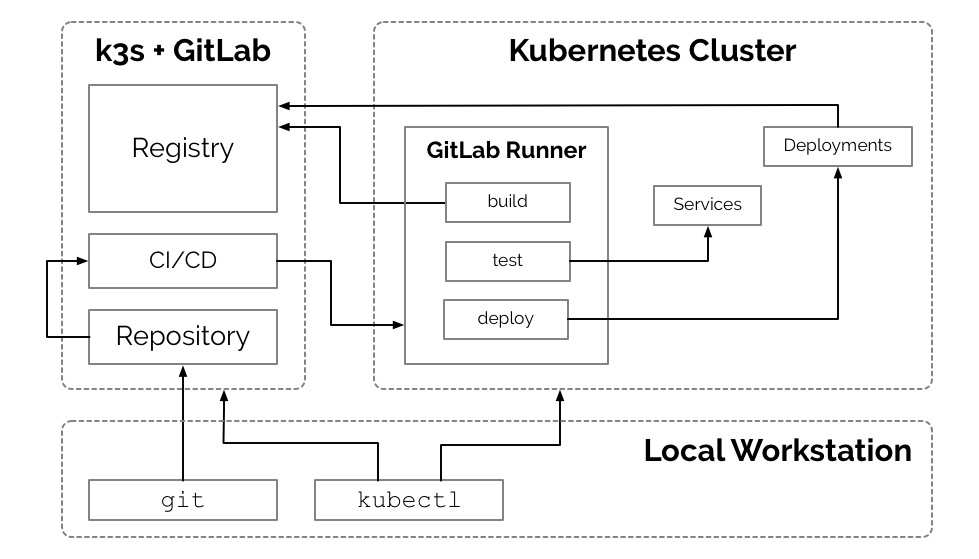
This document outlines the steps for utilizing k3s to manage a self-hosted Gitlab instance. This may be beneficial for individuals and organizations already leveraging Kubernetes for platform development. Many applications such as Gitlab do not need sophisticated compute clusters to operate, yet k3s allows us to achieve additional continuity in the management of development operations. k3s, although slim-down, is a fully functional Kubernetes.
Containers have made applications like Gitlab incredibly portable, Kubernetes brings that portability to container management and k3s makes that portability available at the smallest of scale.
This document outlines a process for setting up a Gitlab instance in a single custom node Kubernetes (k3s) cluster on Vultr. However, there is very little difference in utilizing other vendors, such as Digital Ocean or Linode.
Disclosure: Links to Vultr, Digital Ocean and Linode are affiliate links and credit my accounts on those services if you sign up. Affiliate credit helps me offset the expense of setting up environments for developing articles and tutorials. I do not endorse any of these vendors specifically; however, they are all great choices if you are looking for alternatives or redundancies to Google, Amazon, or Microsoft. Kubernetes is a Cloud Native and Vendor Neutral solution, and if implemented well, the specific vendor should only be a high-level business concern.
This document utilizes one Los Angeles instance of a 2 CPU / 4096MB Memory Ubuntu 18.04 x64 server on Vultr with Private Networking enabled and a "Server Hostname & Label" of gitlab.apk8s.dev. At the time of this writing, the instance cost is $20/mo, or 3 cents per hour.
Add DNS A records for your domain, such as: gitlab.apk8s.dev and *.gitlab.apk8s.dev pointed to the public IP address of the Vultr instance above. See your Domain Name / DNS provider for instructions on adding A records.
Login to the new server (IP) as the root user:
ssh root@NEW_SERVER_IPUpgrade any outdated packages:
apt update && apt upgrade -yInstall k3s
k3s is "Easy to install. A binary of less than 40 MB. Only 512 MB of RAM required to run." this allows us to utilized Kubernetes for managing the Gitlab application container on a single node while limited the footprint of Kubernetes itself.
curl -sfL https://get.k3s.io | sh -k3s is now installed and the Kubernetes API is listening on the public IP of the server through port 6443.
From your local workstation you should be able to issue a [curl] command to Kubernetes:
curl --insecure https://SERVER_IP:6443/The new k3s cluster should return a 401 Unauthorized response with the following payload:
{
  "kind": "Status",
  "apiVersion": "v1",
  "metadata": {

  },
  "status": "Failure",
  "message": "Unauthorized",
  "reason": "Unauthorized",
  "code": 401
}
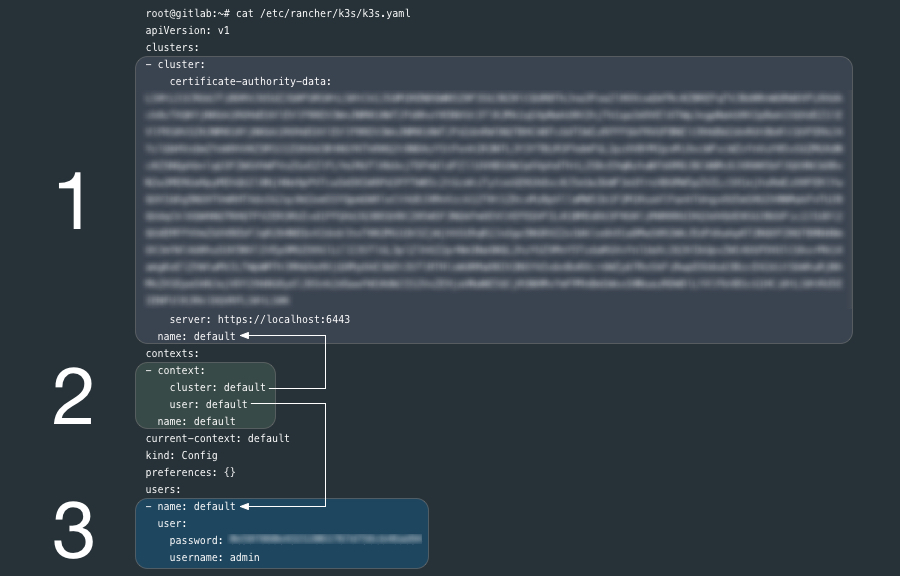
k3s credentials are stored on the server at /etc/rancher/k3s/k3s.yaml:
Review the contents of the generated k8s.yml file:
cat /etc/rancher/k3s/k3s.yamlThe k3s.yaml is a Kubernetes config file used by kubectl and contains (1) one cluster, (3) one user and a (2) context that ties them together. kubectl uses contexts to determine the cluster you wish to connect to and use for access credentials. The current-context section is the name of the context currently selected with the kubectl config use-context command.
Ensure that kubectl is installed on your local workstation.
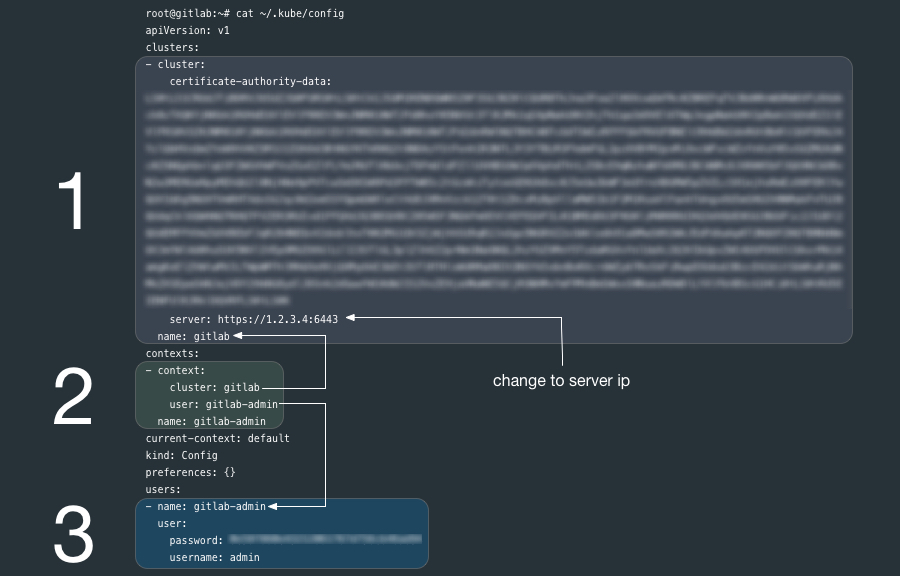
If you have kubectl installed on your local workstation, notice that the k8s.yml file on the new k3s node is a kubectl config file similar to the file ~/.kube/config generated by kubectl.
You can copy the entire k8s.yml file over to ~/.kube/config if you have not other contexts there already, it may also be a good practice to rename the cluster, user and context from default to something more descriptive.
If you already have clusters, user and contexts in your ~/.kube/config you can add these new entries after renaming them.
Another option is to create another file such as ~/.kube/gitlab-config and set the KUBECONFIG environment variable to point to it. Read more about kubectl configuration options.
Before you being configuring k3s make sure kubectl pointed to the correct cluster:
kubectl config use-context gitlab-adminEnsure that you can communicate with the new k3s cluster by requesting a list of nodes:
kubectl get nodesIf successful, you should get output similar to the following:
NAME               STATUS   ROLES    AGE    VERSION
gitlab.apk8s.dev   Ready    <none>   171m   v1.14.1-k3s.4
Install Cert Manager / Let's Encrypt
Gitlab ships with Let's Encrypt capabilities, however, since we are running Gitlab through k3s (Kubernetes) Ingress (using Traefik,) we need to generate Certs and provide TLS from the cluster.
Create Cert Manager's Custom Resource Definitions:
kubectl apply -f https://raw.githubusercontent.com/jetstack/cert-manager/release-0.8/deploy/manifests/00-crds.yamlInstall Cert Manager with the ./k8s/0000-global/001-cert-manager-helm.yml manifest (the k3s way):
kubectl create -f ./k8s/0000-global/001-cert-manager-helm.yml Ensure that cert manager is now running:
kubectl get all -n cert-managerOutput:
NAME                                          READY   STATUS    RESTARTS   AGE
pod/cert-manager-5d669ffbd8-2s6pm             1/1     Running   0          5m11s
pod/cert-manager-cainjector-79b7fc64f-n9qdt   1/1     Running   0          5m11s
pod/cert-manager-webhook-6484955794-j6cpr     1/1     Running   0          5m11s

NAME                           TYPE        CLUSTER-IP     EXTERNAL-IP   PORT(S)   AGE
service/cert-manager-webhook   ClusterIP   10.43.103.18   <none>        443/TCP   5m11s

NAME                                      READY   UP-TO-DATE   AVAILABLE   AGE
deployment.apps/cert-manager              1/1     1            1           5m11s
deployment.apps/cert-manager-cainjector   1/1     1            1           5m11s
deployment.apps/cert-manager-webhook      1/1     1            1           5m11s

NAME                                                DESIRED   CURRENT   READY   AGE
replicaset.apps/cert-manager-5d669ffbd8             1         1         1       5m11s
replicaset.apps/cert-manager-cainjector-79b7fc64f   1         1         1       5m11s
replicaset.apps/cert-manager-webhook-6484955794     1         1         1       5m11s
Add a ClusterIssuer to handle the generation of Certs cluster-wide:
*NOTE: First edit ./k8s/0000-global/005-clusterissuer.yml and replace YOUR_EMAIL_ADDRESS with your email address.
kubectl apply -f ./k8s/0000-global/005-clusterissuer.yml ./k8s/1000-gitlab/000-namespace/000-namespace.yml creates the Namespace gitlab:
kubectl apply -f ./k8s/1000-gitlab/000-namespace/000-namespace.ymlGenerate a TLS Certificate (first edit ./k8s/1000-gitlab/000-namespace/010-certs.yml and replace apk8s.dev with your domain):
kubectl apply -f ./k8s/1000-gitlab/000-namespace/010-certs.yml./k8s/1000-gitlab/100-gitlab/10-service.yml creates two Services. Service gitlab provides a backend service for Ingress to serve the Gitlab web UI. Service gitlab-tcp exposes port 32222 for interacting with Gitlab over ssh for operations such as git clone, push and pull.
kubectl apply -f ./k8s/1000-gitlab/100-gitlab/10-service.yml./k8s/1000-gitlab/100-gitlab/40-deployment.yml creates a Gitlab Deployment.
kubectl apply -f ./k8s/1000-gitlab/100-gitlab/40-deployment.ymlThe Gitlab deployment launches a single Pod creating and mounting the directory /srv/gitlab/ on the new server for the persistent storage for configuration, logs, and data (Git repos.) containers (registry) and uploads.
        - name: config-volume
          hostPath:
            path: /srv/gitlab/config
        - name: logs-volume
          hostPath:
            path: /srv/gitlab/logs
        - name: data-volume
          hostPath:
            path: /srv/gitlab/data
        - name: reg-volume
          hostPath:
            path: /srv/gitlab/reg
        - name: uploads-volume
          hostPath:
path: /srv/gitlab/uploadsGitlab may take a minute or more to boot. Once Gitlab is running locate the newly generated config file gitlab.rb on the server at /srv/gitlab/config/gitlab.rb.
The initial gitlab.rb file is commented out sample configuration so you may simply back it up and add a new file with the following. Replace .apk8s.dev with your domain.
/srv/gitlab/config/gitlab.rb:
external_url 'https://gitlab.apk8s.dev'

nginx['listen_port'] = 80
nginx['listen_https'] = false
nginx['proxy_set_headers'] = {
  'X-Forwarded-Proto' => 'https',
  'X-Forwarded-Ssl' => 'on'
}

gitlab_rails['gitlab_shell_ssh_port'] = 32222

registry_external_url 'https://reg.gitlab.apk8s.dev'

gitlab_rails['registry_enabled'] = true

registry_nginx['listen_port'] = 5050
registry_nginx['listen_https'] = false
registry_nginx['proxy_set_headers'] = {
  'X-Forwarded-Proto' => 'https',
  'X-Forwarded-Ssl' => 'on'
}

prometheus['monitor_kubernetes'] = falseThe Kubernetes Ingress manifest ./k8s/1000-gitlab/100-gitlab/50-ingress.yml sets up Traefik to direct requests to the host gitlab.apk8s.dev to backend Service named gitlab.
kubectl apply -f ./k8s/1000-gitlab/100-gitlab/50-ingress.ymlBrowse to https://gitlab.apk8s.dev (replace top-level domain with your domain). NOTE: New Gitlab installs present a screen to set the admin (root) user's password. Do this immediately to prevent someone else from setting up Gitlab for you.
Remember to keep the directory /srv/gitlab on the server backed up.


